Creating Slide Shows in iPad’s Keynote
As much as I like my iPad, as it stands now I’ll probably be consuming more media than producing traditional content on the device. However, as I wrote about in my pre-launch article, displaying photos is one production feature that professional and amateur photographers will find useful.
The iPad has a couple of awesome ways to show off photos. The first one is the Picture Frames feature that you can activate by tapping the designated button that appears in the Lock Screen mode. It will present a slide show of all your photos in your iPad Photos library, or you can go into Systems>Picture Frames and select which album of photos you want it to play, as well the type of transitions you want it to use.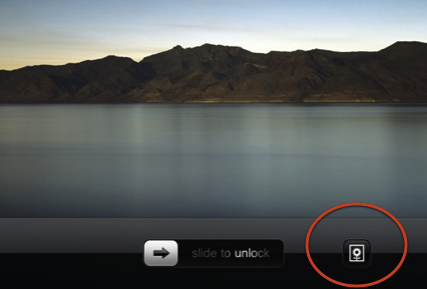
The other option is to launch the Photos app and select an album that you want to turn into a slide show. In the iPad version of slideshows, you can also add background music from your iPod collection on the device. Both options are very easy to set up and photos display beautifully.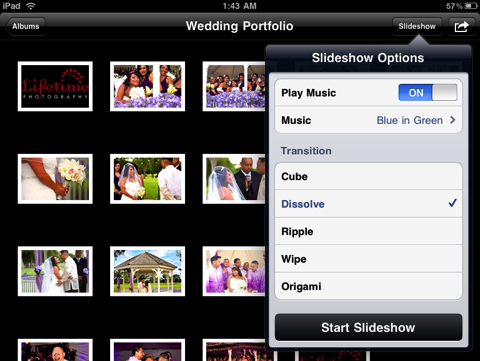
Keynote for the iPad
Another option for displaying images is to use Apple’s Keynote app, optimized for the iPad. Keynote enables you incorporate graphic themes, add titles and animations to your slide shows.
Before I go into explaining what I learned in using the app, I want to say up front that it may not be worth the $9. First off, if you want to import existing Keynote presentations, they must be formatted in the ’09 desktop version of Keynote. I still use the ’08 version because I have never found a compelling reason to upgrade to the ’09 version of iWorks.
Secondly, you cannot add background music or movies in your presentation, in the iPad version of Keynote. The app apparently supports video files in imported presentations, but checking the Apple Support site, it's clear that many users can't get the iPad version to play movie files in presentations. And finally, you cannot edit photos in the app as you can with the desktop version.
Creating an Image Slide Show
If you have previous experience with using the desktop version of Keynote, the iPad version won’t be too foreign to you. As with other iPhone and iPad applications, you basically build content by tapping buttons and making selections. The manual for the iPad Keynote describes all the how-tos and tools for the app. I’m going to share how to create a basic presentation for presenting photos, and what I like and dislike about the process.
How to Create a Basic Presentation
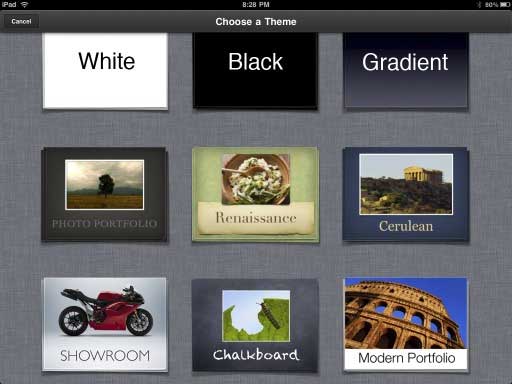
Your start off by selecting a theme, and then you import images one at a time from the Photo library of your iPad. To import images, you either select the media and tools icon in the menubar, or you select the same icon in the slide itself.
After an image is imported into a slide, you tap the Edit button in the menu bar to resize, crop, and rotate images. You can select and resize the blue edit points to resize the mask of a slide. Use the slider button to resize the image itself. And if you want to rotate the image, tap and use two fingers.
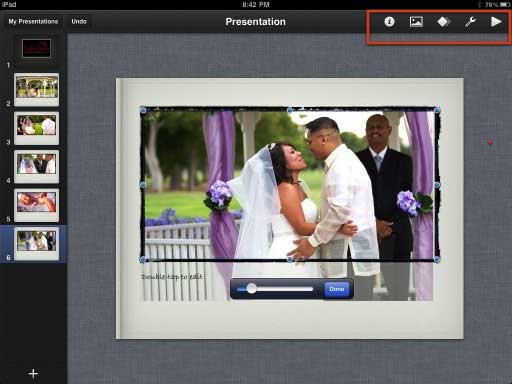
Tap on the image again and you can activate the cut, copy, delete and replace buttons.
At this point you can also add builds, e.g. timing and transitions for each slide. Sometimes the Builds tool pops up when you tap the image, but if not you can select Builds button in the menu bar.
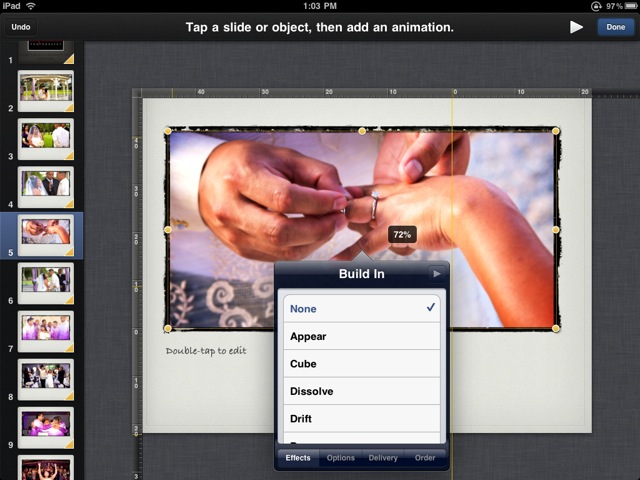
You get several options for animating how you want images and other items to appear in the slide, how long they should display, and what type of transition (anagram, cube, dissolve, doorway, drop, etc.) you want to use.
For slides with titles or other text, simply tap the text box (which can include builds as well) and edit it.
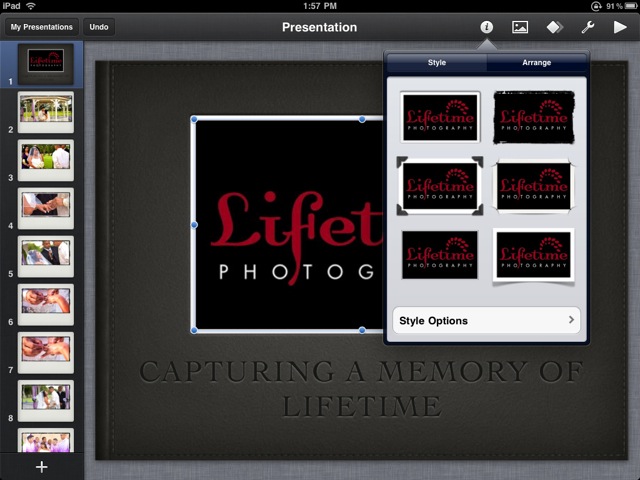
You can select the Styles button in the menubar to change border effects and add shadows and reflections below images and other items on slides. The Arrange button allows you to flips items and edit the mask of a slide.
As you might guess, there’s also an Undo button in the menubar. It will take you back to where you originally started. However, there is no reset button for re-doing your undos.
Exporting Presentation
You can export/transfer presentations through email, iTunes, or via Apple‘s beta iWorks website. When I tried transferring using mail, it said that file (of 15 slides) was too large. Transferring to iTunes means that you have to connect your iPad to your computer in order to access it. And exporting to iWorks seems to be a poor option, especially if you don’t want to upgrade to iWorks ‘09.
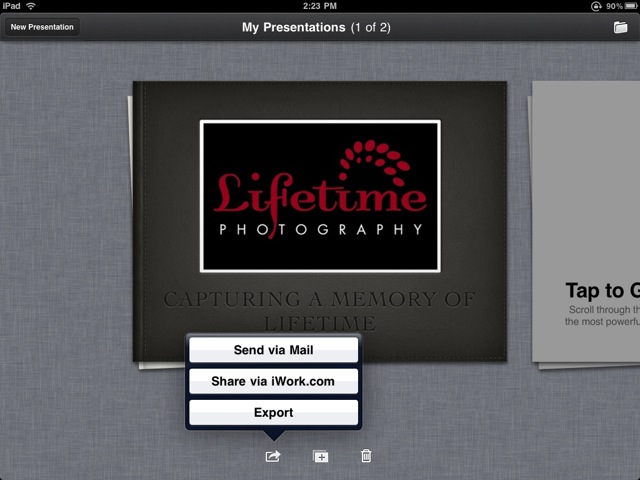
Apple could have enabled presentations and other iPad iWork documents to be exportable to the iPad‘s Photos folder, so those files could be accessed by Dropbox and other file sharing applications.
Overall, if you need to put together a presentation in a pinch, Keynote for the iPad will fit the bill do the trick without any bells or whistles. But just as the iPad is not a laptop replacement for most content producers, Keynote for the iPad is also not a replacement for the desktop version. There’s much that can be improved and no doubt it will be in future updates.
 del.icio.us
 Digg
Digg Facebook
 Slashdot
 StumbleUpon

Comments
“However, there is no reset button for re-doing your undos. “
Just tap and hold Undo in the menubar and you will get a popup with Undo and Redo.
Also, Please, it’s “iWork” not “iWorks”
Most of us have no doubt seen the commercials featuring the Photos app on the iPad, but what I didn’t realize until I bought it is that, unlike with the iPhone and iPod touch, you can add background music to the slideshows created on the iPad.
Senior Healthcare Consultants
This is a good article for people like me that is new to this. It is important to understand that iPad is capable of this because this will add to the importance of this tool. - Mario Romano
iPad’s keynote gives you even faster ways to create, more captivating ways to present, and smarter ways to share. undermount kitchen sink
You should take part in a contest for one of the best blogs on the web. I will recommend this site!
deck de madeira | pallet | fabrica madeira plastica
This is pretty nice, I used this in my last presentation I did at my office. I used my chinese tablet pc instead of my iPad mind you.
hammermill
roller shell of pellet mill
Thank you very much for the guide. I’m gonna try to create my own slide show with my ipad.
Insurance Company Ratings
Apple could have enabled presentations and other iPad iWork documents to be exportable to the iPad‘s Photos folder.
Annuities Explained
You will get several options for animating how you want images and other items to appear in the slide. A truly great application.
Retirement Planning